Inspired by this
page, but there's pretty much no original code left. Many thanks
to Gerard Talbot and 'dhtml' on the comp.lang.javascript newsgroup
for many pointers, critiques, and ideas.
Tested on Firefox 2 and 3, Internet Explorer 7, Opera 9.5, and Safari 3.1 for Windows and MacOS X.
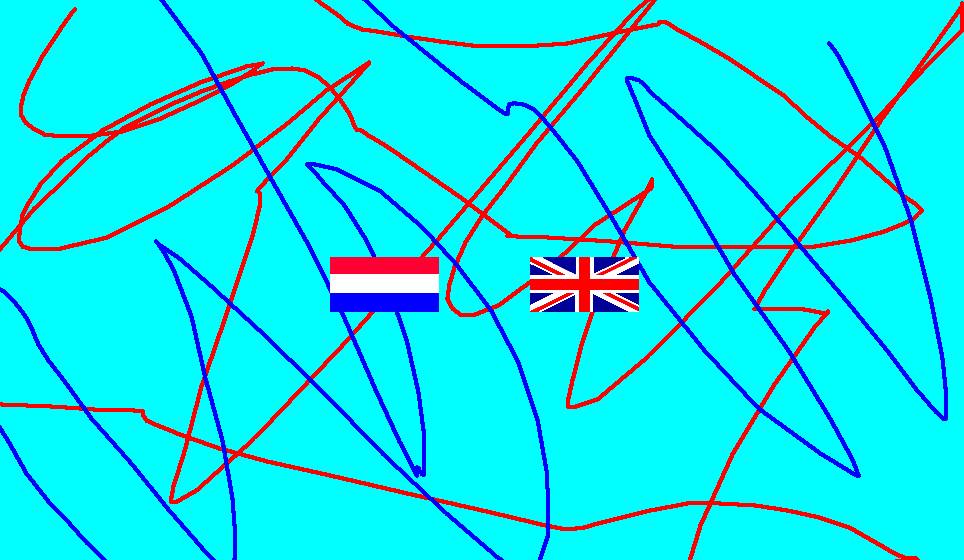
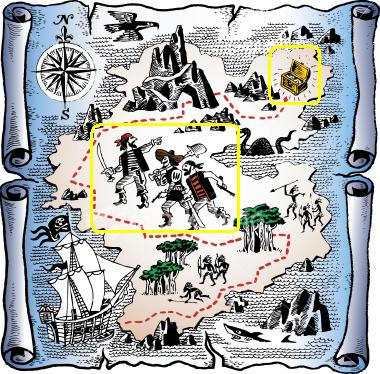
Roll the mouse button over the images below to see the magnifiers in action.
|
|
|
magnifier.js and magnifier.css to the same
place as your HTML file.head section of your HTML:
If you don't have access to the<link type="text/css" href="magnifier.css" rel="stylesheet"> <script type="text/javascript" src="magnifier.js"></script>
head of your HTML, e.g.,
you are working in a content management system, all is not lost.
Put the Javascript line in the body section of your HTML file, and read on.
divs, in this
pattern, with the class attributes shown:
<div class="magnifier" style="width: swpx; height: shpx;">
  <div class="maglens">
    <img src="image-file" class="maglarge" style="width: lwpx; height: lhpx;" />
  </div>
</div>DIV.Here's the code for the two examples above:
<div class="magnifier" style="height: 297px; width: 512px; margin: 20px;">
  <div class="maglens">
   <img src="vlag.jpg" class="maglarge" alt="example image" ismap="ismap" usemap="#kaart"
        style="height: 560px; width: 964px;" />
  </div>
</div>

<div class="magnifier" style="height: 249px; width: 253px; margin: 20px">
  <div class="maglens" style="width:100px; height:75px">
    <img src="treasure-map.jpg" class="maglarge" alt="treasure map" ismap="ismap" usemap="#pirate"
      style="height: 374px; width: 380px;" />
  </div>
</div>
You can magnify as many images as you want, as long
as they are in different magnifier divs.
If you don't have access to the head section of your
HTML, you can't load the CSS file. In that case,
use this approach to making magnifiers.
Problems? Check these debugging tips.
By default, the Javascript creates the reduced image to display.
If you want to use a customized small image instead,
put the img element for it
in the div, with the class magsmall,
ahead of the maglens DIV, like this. The size
of the small image will be adjusted to that of the
div.
<div class="magnifier" style="width: swpx; height: shpx;">
  <img src="image-file" class="magsmall" />

  <div class="maglens">
    <img src="image-file" class="maglarge"
         style="width: lwpx; height: lhpx;" />
  </div>
</div>
Note: You can use two images of the same size to do "reveal" rather than magnification. For example, here's a "magnifier" that shows what a galaxy looks like in the X-ray spectrum. These images are from the Chandra X-ray Observatory.
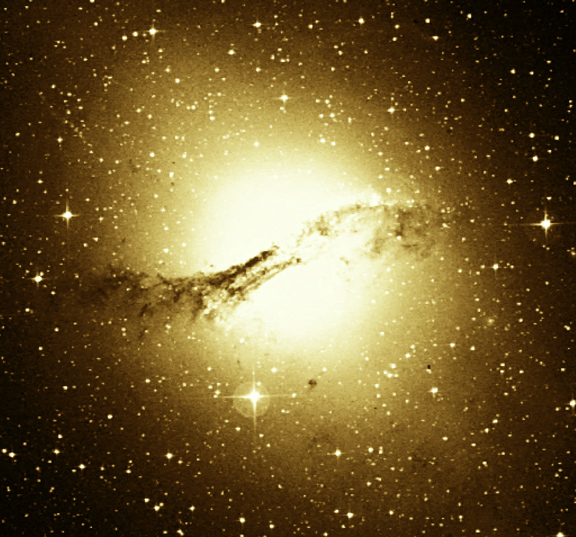
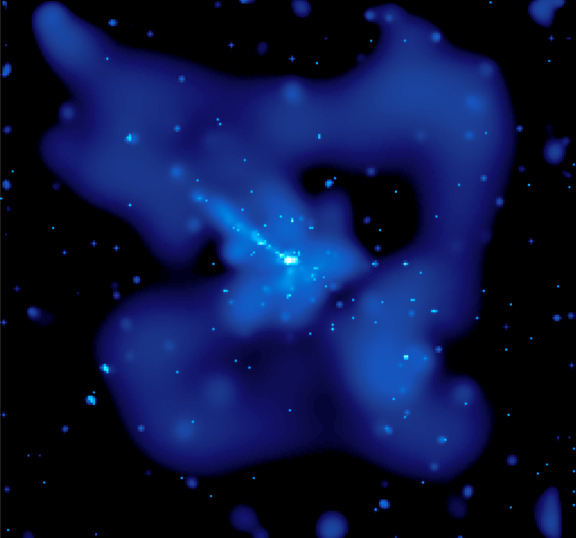
Here's the code for the Chandra example:
<div class="magnifier" style="width: 288px; height: 269px">
  <img class="magsmall" src="0157_optical.jpg" alt="optical view" />
  <div class="maglens" style="width:75px; height:75px">
    <img class="maglarge" src="0157_xray.jpg" alt="x-ray view"
     style="width: 288px; height: 269px" />
  </div>
</div>To change the default size of the magnifying glass,
modify the width and height defined for maglens
in magnifier.css:
.maglens {
  position: absolute;
  overflow: hidden;
  width: 150px;
  height: 150px;
}If you want clickable regions in the image, use an HTML image map.
Put the
ismap and usemap attributes on the large image.
Both examples at the top of this page are image maps.
If you can't use the CSS classes, you can define magnifiers
by explicitly putting the necessary CSS styles on the div
elements, as follows:
position: absolute.
You probably should also give the small image border-style: none.
maglens div must have the inline style
position: absolute; overflow: hidden; and an explicit width
and height in pixels.magnifier div must have the inline style
position: relative; overflow: hidden; and, as before, an explicit width
and height in pixels.
large,
small and lens, instead of the classes maglarge,
magsmall and maglens. Be sure to use distinct id's,
as required by the W3C standards.Here's the code for the previous two examples:
<div style="position:relative; overflow: hidden; height: 249px; width: 253px; margin: 20px">
  <div id="lens1" style="position:absolute; overflow: hidden; width: 100px; height: 75px">
    <img src="treasure-map.jpg" id="large1" alt="treasure map" ismap="ismap" usemap="#pirate"
         style="position:absolute; border-style:none; height: 374px; width: 380px" />
  </div>
</div>

<div style="position: relative; width: 288px; height: 269px">
  <img id="small2" src="0157_optical.jpg" alt="optical view"
       style="position:absolute" />
  <div id="lens2" style="position:absolute; overflow: hidden; width: 75px; height: 75px">
    <img id="large2" src="0157_xray.jpg" alt="x-ray view"
         style="position:absolute; width: 288px; height: 269px" />
  </div>
</div>|
|
For backward compatibility with previous versions of this package, you
can also use
clipping rectangles
to define the magnifier lens instead of the maglens div.
Because browser support for
clipping rectangles is poor, this approach is no longer recommended.
Note: Avoid commas in the rectangle if you need to support Internet Explorer.
Here's the code for the two examples, using clipping rectangles. Note that there
is no maglens div:
<div style="position:relative; overflow: hidden; height: 249px; width: 253px; margin: 20px">
 <img src="treasure-map.jpg" id="large3" alt="treasure map" ismap="ismap" usemap="#pirate"
    style="position:absolute; border-style:none; height: 374px; width: 380px; clip:rect(0px 100px 75px 0px);" />
</div>

<div style="position: relative; width: 288px; height: 269px">
  <img id="small4" src="0157_optical.jpg" alt="optical view"
     style="position:absolute" />
  <img id="large4" src="0157_xray.jpg" alt="x-ray view"
     style="position:absolute; width: 288px; height: 269px; clip: rect(0px 75px 75px 0px);" />
</div>|
|
The magnifier tries to catch many common errors with images. If no magnifier appears when you roll over your images, or the magnifier is distorted or off-center, check the following:
magnifier.js was loaded. Type
javascript:alert(MAGNIFIER) -- exactly like that --
into the browser address field. An alert box will appear. If
it contains undefined,
there was a problem loading the Javascript. Make sure the file has been
properly uploaded to your server,
and that your HTML contains the correct code for loading
it.
javascript:alert(MAGNIFIER.data().length)
into the browser address field. An alert box will appear with the number
of magnifiers the code found. If it's zero, make sure your the images have
the correct classes or ids, and the correct HTML structure.
You should always strive for zero errors in validation. Unfortunately, if you use clipping rectangles, you'll have to put up with complaints about missing commas if you want to support Internet Explorer.
div. Don't
forget the px, with no intervening spaces, e.g.,
12px, not 12 px.clip:rect(0px 50px 75px 0px), not
clip:rect(0px, 50px, 75px, 0px), because
Internet Explorer, as of version 7, doesn't allow them.
As the mouse moves over the small image, the Javascript
repositions the lens (either the maglens div or the clipping
rectanthe mouse, and positionsgle) to stay centered
under the large image so that
what's the lens shows is the region that corresponds to where the mouse is in the
small image.
Send comments to Chris.Riesbeck@gmail.com
